
Don’t you wish there was a magic button for moving posts from an old website to a new one? In this era of artificial intelligence (AI), there may be one, but I haven’t found it.
But I did find the next best thing for me. So, I thought I’d share 3 simple tricks I discovered while setting up my new website.
Moving Posts Detour
I admit I am no techie. But I do know enough to muddle myself through the wonderful world of WordPress. Give me a good, SIMPLE set of instructions and I’ll run with it.
But given my ingrained need to be unique (not to mention stubborn), I always seem to have some twist to my plans.
I am creating a new website with a new DBA (Doing Business As), logo, brand, etc. In my constant search for simple, I decided to eliminate my other sites except this one, Simply Stated Business, and the new one.
However, I did want to keep some of the older posts from two different sites. So, how do I decide which ones? And I had additional questions about making the move.
- Is there a way to get a list of each post in each site and its corresponding url?
- What if I want to export some but not all from a category?
- How do I redirect the old site to the new?
By now, I’ve lost the techie people. And that’s okay. This post is for the rest of us who may not do this often and appreciate resources that help us out. So. let’s get started.
Note: The following relates to WordPress.org, the self-hosted version. It’s the one where you pay for a hosting provider, such as Hostgator, Bluehost, GoDaddy, etc.
If you use WordPress.com, refer to this how-to article, Export Your Website’s Content.
Table of Contents
Exporting Post URLs
You may not know this (I didn’t) but you can export all the urls for each blog post on a site. Being a visual person, I prefer a list in a spreadsheet for both the big picture view and the details. Okay, maybe it’s not so visual as it is old school. Hey, I’m old. 🙂
I found a simple solution – the Export All URLs plugin. How’s that for appropriately named? You have options for the format it is exported in.
TIP: For newbies and the quasi-techie people, WPBeginner.com is a great resource for all things WordPress.
I have no affiliation with WPBeginner. I just like them. They have a step-by-step guide for Export All WordPress URLs and various formats for exporting posts.
I wanted to move posts from multiple categories, so the following is the method I used.
1 – First, back up your old site.
You do back up your site regularly, right? There are numerous plugins that back up your WordPress site. Most hosting providers offer some kind of back-up, either as a part of their services or as a paid option. So, check with your provider.
If you’re interested in plugins, Elegant Themes shared this 6 Best WordPress Backup Plugins in 2024 (Compared).
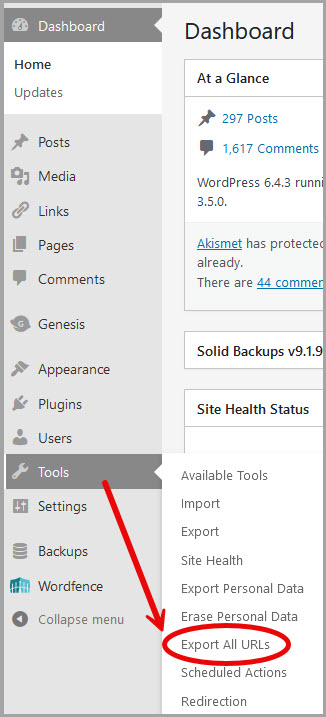
2 – Download and activate the plugin.
After you have activated the Export All WordPress URLs plugin, you are ready to start. Go to your WordPress Dashboard > Tools > Export All URLs.
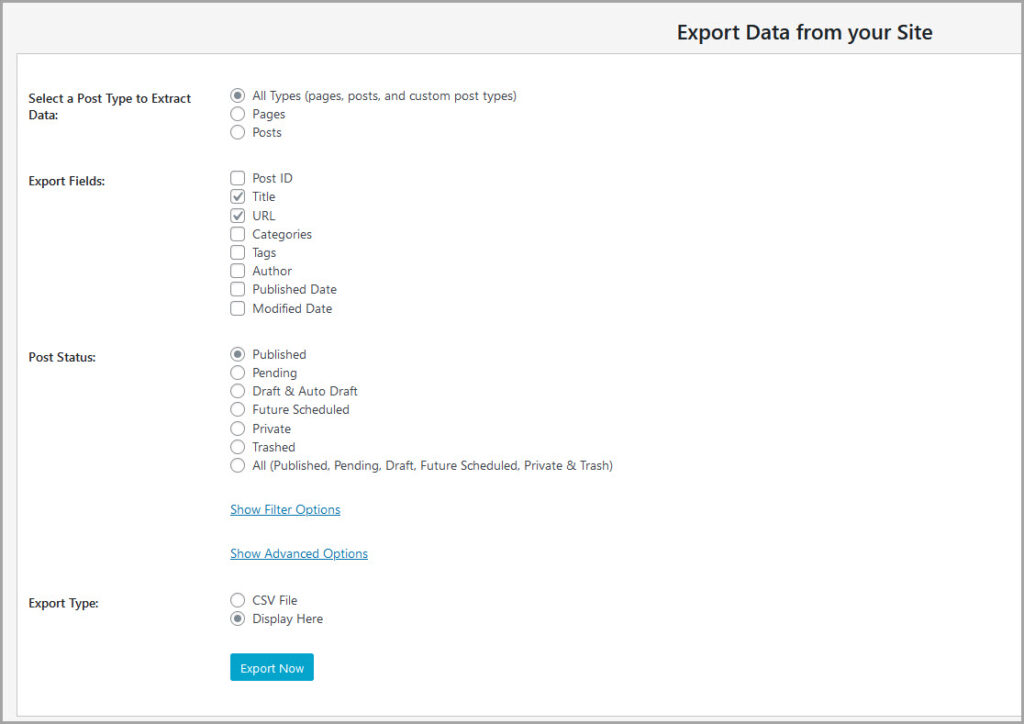
3 – Make your export selection.
As illustrated below, you have several options for exporting. For my purposes, I added Categories to the default selections shown below.
- I exported each site’s urls into an Excel spreadsheet.
- This allowed me to sort in various manners – alphabetically by post name, url, or whatever struck my fancy.
- The list helped me develop a strategy in what I kept and what I did not.
Exporting Select Posts
What if you do not want to move all the posts? Perhaps you want to move a select few. How do you do that?
That was the case for me. Shout out to a Hostinger tutorial where I found a simple (and I thought brilliant) way to do this. Refer to the tutorial’s Method 2 for this process.
All of the posts for the other two blogs are under my name. So, this method solved my problem of moving posts for a select few from different categories.
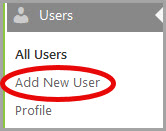
1 – Add another username under Users.
I prefer using the term “another” instead of a “dummy” username. Especially because that dummy is me. 😉 Go to your WordPress Dashboard > Users > Add New User.
2 – Fill in the New User information.
After clicking on the Add New User, an information box pops up. Fill in the New User information.
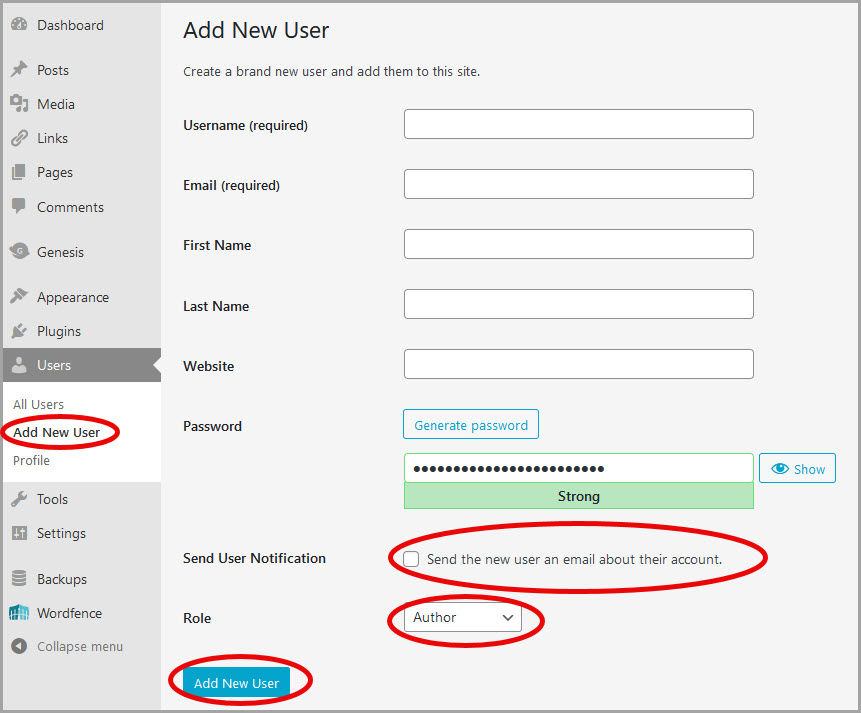
- Enter a different username than the one you are using.
- Add an email address different from the one you use for the site.
- You can skip the optional First Name, Last Name, Website.
- Create a password or use the password generator.
- You can uncheck the box to Send the new user an email about their account.
- Use the dropdown menu to select Author.
- Click on Add New User.
3 – Next, select the posts you want to move and edit the Author username.
Now you’re ready to choose the posts you want to move. Go to your Dashboard > Posts > All Posts.
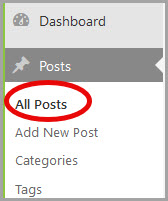
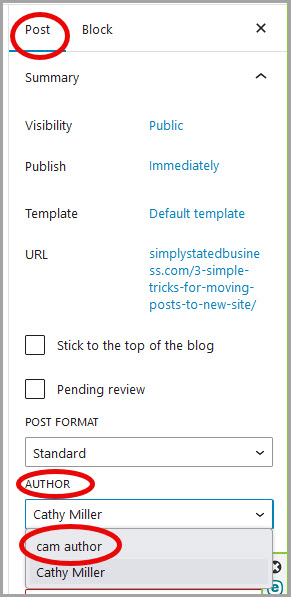
Open the individual post you want.
- Go to “Post” side menu.
- Click on the dropdown located under AUTHOR.
- Choose the new username.
4 – Select the Export Tool.
After you have changed the Author names on all the posts you want to move, you can start the process. Go to your Dashboard > Tools >Export.
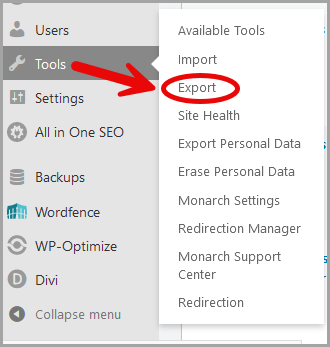
5 – Click on Posts in Export Menu.
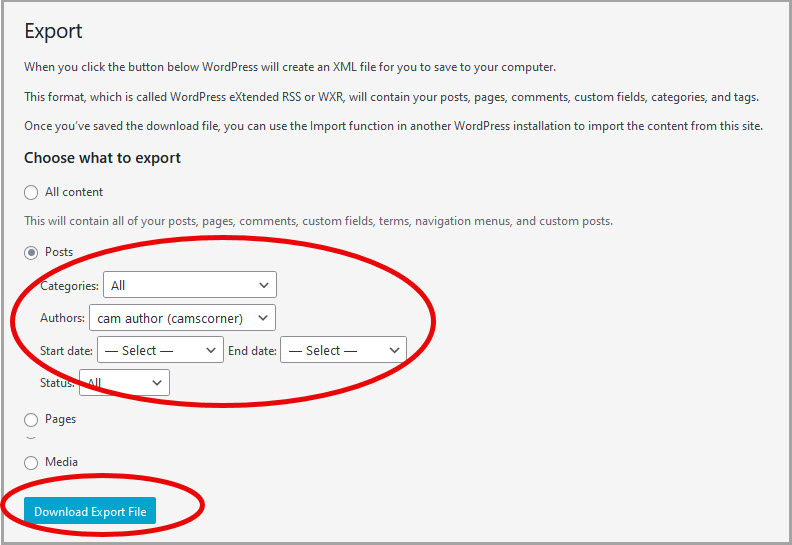
When the Export menu opens, click on Posts. That will expand your options to:
- Categories – you can select a specific category or All.
- Authors – use the dropdown menu to select the username you added.
- Start/End date – assuming you want all under the new username, skip this part.
- Status – Leave it at the default of “All.”
- Click on Download Export File.
Importing select posts.
You are now ready to import those posts to your new site. Yay – happy dance.
1 – Sign on to your new site and import the downloaded file.
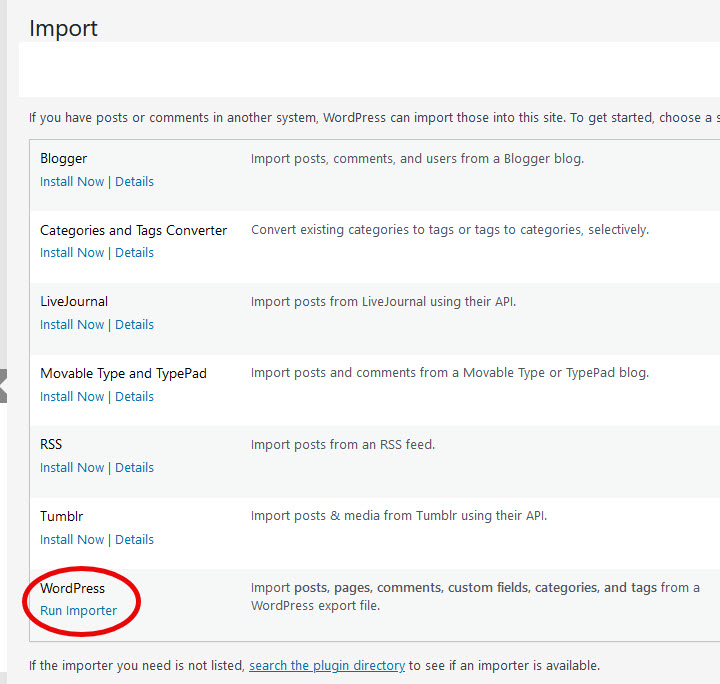
Go to your new site’s Dashboard > Tools > Import.

When the Import window opens, scroll to the bottom, and click on Run importer – under WordPress.
On the Import WordPress, choose the downloaded file from your computer by clicking on Browse. Once selected, click on Upload file and import.

2 – Assign the author to the username for your new site.
The imported file has the username of the one you created at your old site to export the selected posts. You can assign the posts to your username for the new site. That way, the posts are under one username and password.
If you want to include any attachments, check the Download and import file attachments, then click Submit.
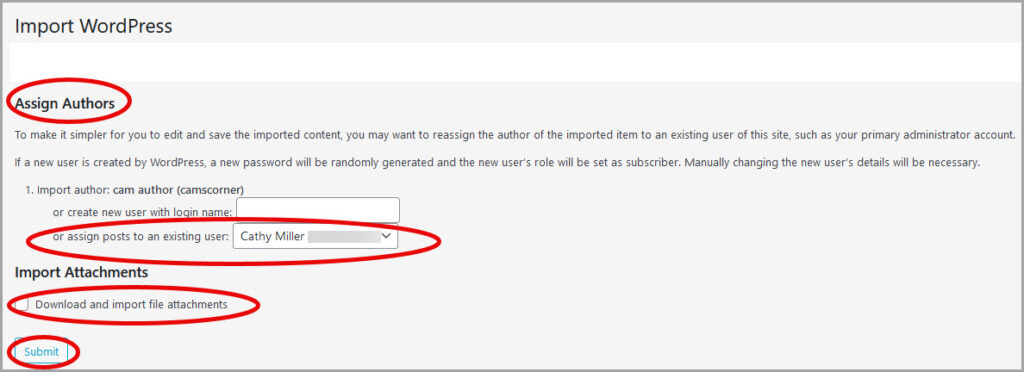
You may need to edit categories if you have added or changed them in the new site. The import contains the post category from the old site.
Redirecting your old site
The simple tip for redirecting your site is in a plugin. Unfortunately, redirecting all those individual posts is not so simple (or not that I know of). But let’s start with the simple.
You know how frustrating it is to click on a link only to get that nasty 404 Not Found message. Imagine an entire site full of 404 error messages.
That is why the internet gods created redirects. This post won’t get into all the different kinds of redirects – just the one associated with this task.
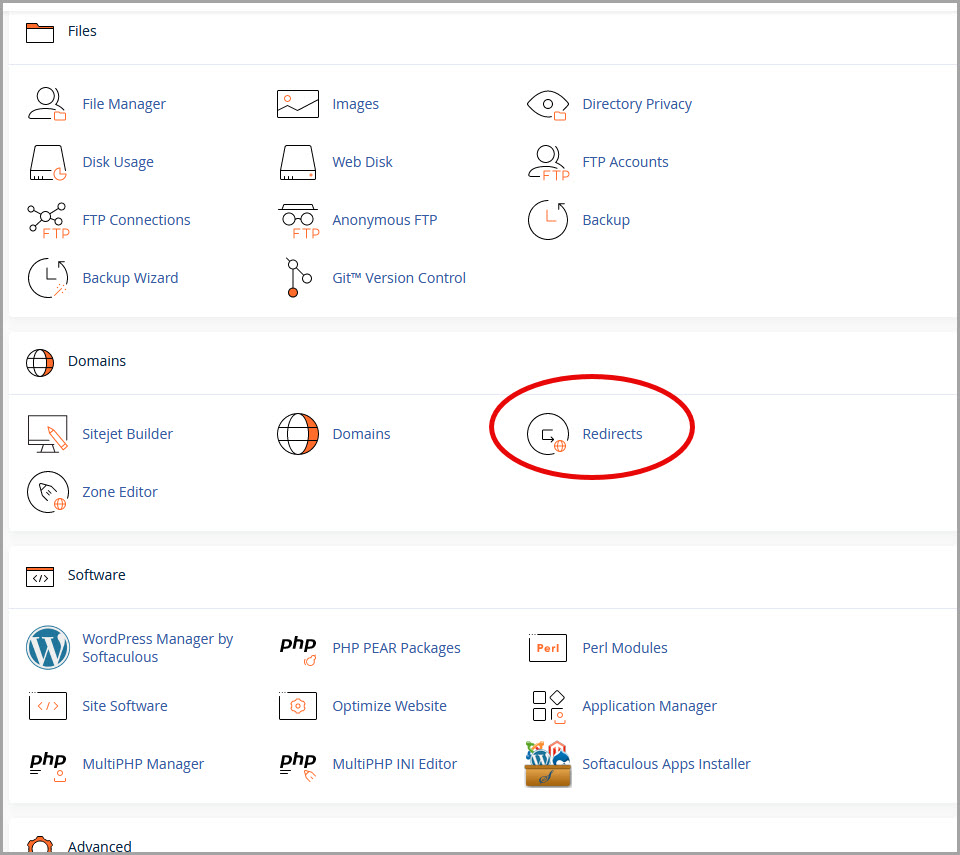
Using your host provider’s redirect.
The following outlines Hostgator’s process. Your host provider may have something similar or completely different. So, check with your host provider.
Sign on to your hosting C-Panel > Redirects.
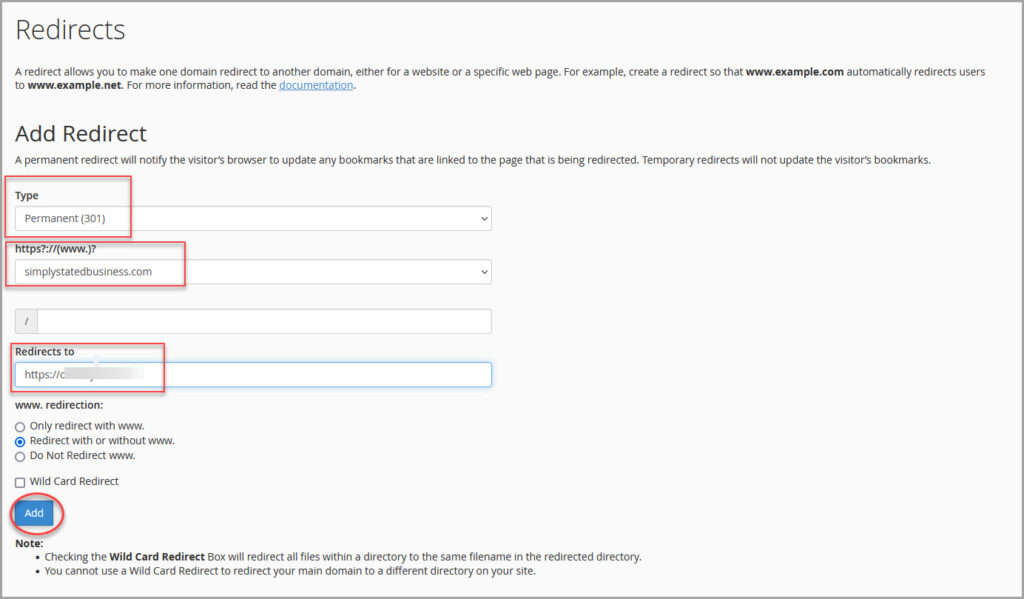
On the Redirect form, go to Add Redirect. Make sure the Type shows Permanent (301). Use the dropdown menu to select.
Click on the dropdown under https?.//(www.)? and select the site you want to redirect (your old site). I left the line underneath that blank.
Next, click on Add. If you type your old site’s url in a browser, it should redirect to your new site.
NOTE: I could not find a SIMPLE explanation of the Wild Card Redirect. So, I did not click that box. If someone can enlighten us (in simple terms), please leave a Comment explaining it. Thank you!
The Individual Post Redirect
If you don’t want to end up with a ton of 404 messages, you should redirect individual posts from the old site to the new site. For my purposes, any post I was not transferring to the new site, I set up a redirection to the new site’s Home page.
I have been using the Redirection plugin for some time. It’s free and simple to use (in my humble opinion). This is how it works.
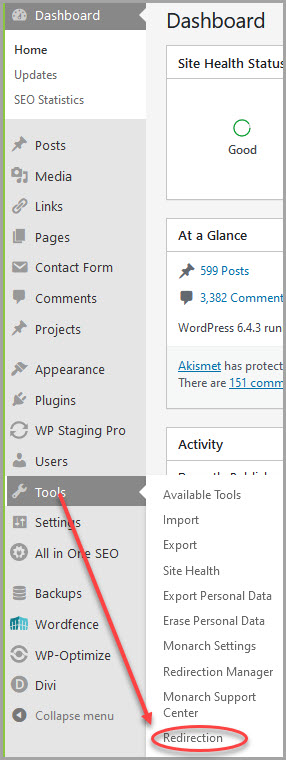
Go to your old site’s Dashboard > Tools > Redirection (Note: the Redirection Manager is part of the All in One SEO plugin that is the Pro version that you pay extra for. I do not pay for that feature as I love the free Redirection plugin). 🙂
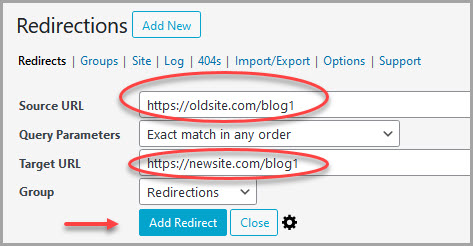
The Add New Redirection page pops up. Put in the url for the individual post from the old site and redirect to the new site. You can test the redirect on the same page after clicking on the Add button. In this example:
- Old site’s url – https://oldsite.com/blog1
- New site’s url – https://newsite.com/blog1
- Make sure the dropdown shows Redirection, then click Add Redirect
Moving Posts Tricks
Moving posts and flipping from an old to a new site is rarely a simple exercise. But with these 3 methods, it made a painful project easier.
- The Export All URLs plugin is free and simple to use and the Excel-sorter in me loves it. 🙂
- Adding another username is a simple (love that word!) way to pull out just the posts you want.
- The Redirection plugin is also free and helps in the battle against the nasty 404 errors.
Resources to Help
This very looong post just scratches the surface. It is not a complete tutorial, so it is important you thoroughly review the process or get someone who is more experienced at this kind of thing.
Below are a few resources.
- WPBeginner.com – as noted earlier, this is a great resource for all things WordPress. I have never done a search on their site that did not produce something useful.
- Hosting provider tutorials – I use Hostgator as my provider. If you need to know how to do something on your host’s C-Panel, it’s best to follow their instructions. But for other WordPress-related topics, you may find other tutorials easier to understand.
- WordPress.org tutorials have a series of videos for those who prefer that form of learning.
What tricks have you discovered when moving posts? Please share your tips and ideas in Comments.
Credit: Bigstock Photo
=====================
Helping you keep your business communication simple, clear & uniquely yours.
=====================
0 Comments